How to Fix not enough space on Unity Hub 2.4.2 on Linux

The problem
While attempting to download the latest Unity Editor, 2020.2.6f1, on my Linux Mint 20.1 box, I got this little gem:
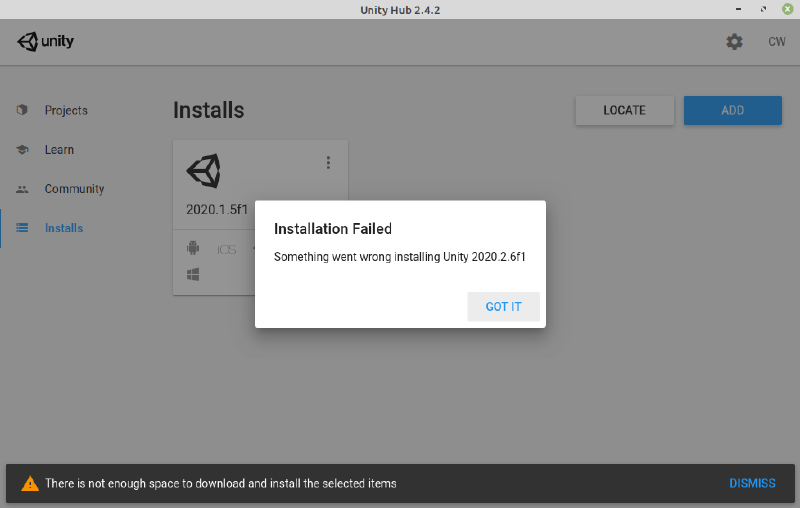
I was unable to install the latest version to play with a game idea I had.
Symptoms
Looking at:
$ df -h
Filesystem            Size  Used Avail Use% Mounted on
udev                   16G     0   16G   0% /dev
tmpfs                 3.2G  2.1M  3.2G   1% /run
/dev/sda5             576G  245G  303G  45% /
tmpfs                  16G  6.9M   16G   1% /dev/shm
tmpfs                 5.0M  8.0K  5.0M   1% /run/lock
tmpfs                  16G     0   16G   0% /sys/fs/cgroup
/dev/sda2              96M   33M   64M  35% /boot/efi
tmpfs                 3.2G   53M  3.1G   2% /run/user/1000
/home/wojno/.Private  576G  245G  303G  45% /home/wojno
After installing just the bare minimum binary for the Unity Editor, I noticed that the /run/user/1000 file system usage was climbing.
I can further see how this drive came to be with:
$ mount | grep user/1000
tmpfs on /run/user/1000 type tmpfs (rw,nosuid,nodev,relatime,size=3282032k,mode=700,uid=1000,gid=1000)
What is /run/user/1000?
According to the documentation for pam_systemd, this is a secure version of the /tmp directory, one which is created for each user logged into the system.
By default, the size of this “drive” is 10% of the available RAM, this is because this is actually a RAM disk that is mounted on login.
As I have RAM to spare:
$ free -h
              total        used        free      shared  buff/cache   available
Mem:           31Gi        10Gi       1.4Gi       310Mi        19Gi        20Gi
Swap:         2.0Gi       132Mi       1.9Gi
My Strategy
I decided to temporarily expand this to work around this issue.
I do not wish to keep this value too high for longer than necessary, as it will constantly use up RAM even if the disk is empty nearly most of the time.
The plan is to add in a new record to /etc/fstab, re-mount the disk, do the install, change /etc/fstab back and re-mount the drive at the default size again.
Changing /etc/fstab
I appended the following to the bottom of the: sudo vim /etc/fstab
none /run/user/1000 tmpfs rw,nosuid,nodev,relatime,size=10G,mode=700,uid=1000,gid=1000 0 1
The main difference is that size is now 10G. I have 32G in my system, so I can spare this amount of RAM. I’m pretty sure it will refuse to mount if there is insufficient RAM and this might brick your account if you reboot and have insufficient RAM. You can also mount this to a drive or a disk-backed file system, but that’s beyond what I did here.
Re-mount the drive
$ sudo mount -o remount /run/user/1000
Verification
$ df -h
Filesystem            Size  Used Avail Use% Mounted on
udev                   16G     0   16G   0% /dev
tmpfs                 3.2G  2.1M  3.2G   1% /run
/dev/sda5             576G  245G  303G  45% /
tmpfs                  16G  8.4M   16G   1% /dev/shm
tmpfs                 5.0M  4.0K  5.0M   1% /run/lock
tmpfs                  16G     0   16G   0% /sys/fs/cgroup
/dev/sda2              96M   33M   64M  35% /boot/efi
tmpfs                  10G  436K   10G   1% /run/user/1000
/home/wojno/.Private  576G  245G  303G  45% /home/wojno
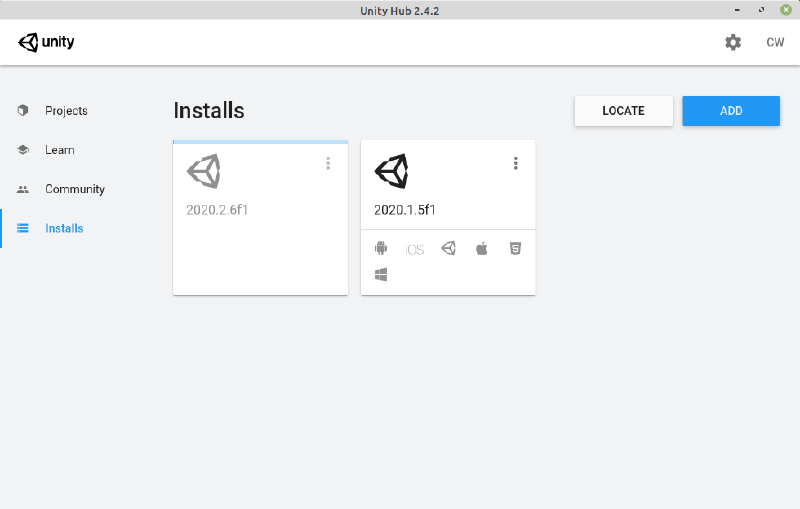
Install!
Now I flip back to Unity, and perform the install with the UI:
Cleanup
Now that it’s installed, remove the record added to “/etc/fstab”, then reboot.
If you want to re-size your volume immediately, you’ll have to edit the fstab, remount, then remove the line from the fstab to default back to the original value on the next boot.
$ sudo mount -o remount /run/user/1000
References
Other tickets or links in which people with this problem have commented, some of which are quite old and don’t talk about Linux, but rather Windows or OSX:
Disclaimer
I’m only describing what I did for my benefit and convey no warranty of operation or that you won’t lose data or brick your system. Proceed with the above instructions at your own risk.
