Developers hate your code, fix it using Interface-Driven Development
You could be writing better code
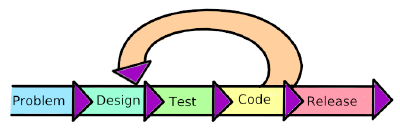
As a developer, I notice that I naturally gravitate toward what I call “depth-first” development. Starting with some end-goal, I plan out the most granular components and work my way back up by assembling them together. Friends, this has lead to some horrible code to use and test.
Projects that do not follow IDD tend to look like the above diagram. Jumping all the way to the bottom, I build out the leaf nodes. Then, designing and building the pieces with which my customer interacts only at the very end.
What is Interface-Driven Development?
IDD is all about helping you stay breadth-first. We do this by keeping your various customers in mind as we plan out our product. You must not only design your feature for your paying customers, but also design your code architecture around making life for other developers as easy and error-free as possible. This isn’t a new concept. I’d like to propose this as but one strategy for implementing Defensive Programming techniques.
Summarily, you start IDD by pretending to be your users and really think about the minimalist approaches to injecting your work into theirs.
When does IDD come into play?
Before you start with IDD, you should already have a very firm grasp on the problems you need to solve. IDD deals with how to implement a solution that is as simple as possible for your users to deploy and understand. It does not deal with the problem definition or justification. You or your Product Manager should have already gone through this process before starting IDD. However, you should not have started programming a solution, yet.
If you’re writing a Proof of Concept (PoC), don’t worry about IDD. In fact, ignore IDD.
Without regard for how customers will use it, the purpose of a PoC is to determine quickly if something is possible or how something works. If you’re writing a PoC, always throw it away and start over when you’re ready to start the actual implementation. Before you start writing that implementation, that’s the time to think about IDD.
Example Problem: Circuit Breaker
Empathizing with Martin Fowler, coming up with examples is difficult. They can’t be too simple, lest you think IDD is a waste of time, but not too difficult such that your reader spends hours trying to grasp the point of the project.
Let’s try to implement a Circuit Breaker library. I’m partial to GoLang, presently, so we’ll use that. For those who don’t know, the Circuit Breaker Pattern is popular in distributed systems. In distributed computing, when a system goes down and comes back up, a “thundering herd” occurs. After a service is restored, each downstream dependency makes their requests all at once and overwhelms the service, slowing recovery. The Circuit Breaker is a client-side rate-limiting technique to prevent this from happening.

The Circuit Breaker Pattern is similar to the electrical circuit in you house. Should the service fail, the breaker opens the circuit, preventing requests from being sent to the server, giving it time to recover. After some time or successful samples of requests, the breaker will close and allow traffic to flow to the backend server again. There are many ways to implement a circuit breaker. Variables include how to count errors so that the breaker knows when to trip. Or how to determine which errors can trip a breaker. Let’s start with the problem statement:
When some microservice goes down, my other application servers overwhelm that service when it comes back up.
Solution: a circuit breaker that will repeatedly return the last error that occurred before it broke without bothering the swamped service and it will automatically self-heal after the service stabilizes.
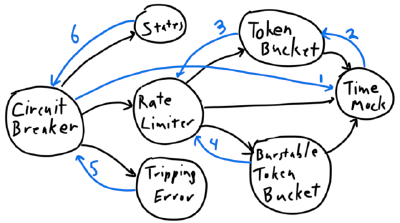
The Circuit Breaker Lifecycle
Circuit Breakers have at least 2, but usually 3 states:
- Closed: Everything is working, traffic is being sent to the backend
- Open: A threshold of errors has occurred, traffic is no longer being sent to the backend, return the last error/exception you got
- Half-Open (optional): After the open state period has expired, allow some traffic to the backend, but return to the Open state more quickly than you would from the Closed state.

For simplicity and brevity, we’ll be skipping the half-open state for this example. Closed will transition to Open, Open will transition to Closed after a time. This state needs to be shared among all calls to the same backend. If we have a multi-threaded server that is calling the backend, all threads need to respect the circuit breaker’s state.
Attempt #1: Head-first into the code!
For our first attempt, let’s just start writing code:
headFirst/circuit_breaker.go
package headFirst

import (
	"errors"
	"sync"
	"time"
)

type CircuitBreaker struct {
	mu *sync.Mutex

	isOpen bool
	openTime time.Duration
	errorThreshold int

	errorCount int
	openExpiresAt time.Time
}

func NewCircuitBreaker(openTime time.Duration, errorThreshold int) *CircuitBreaker {
	return &CircuitBreaker{
		mu:             &sync.Mutex{},
		isOpen:         false,
		openTime:       openTime,
		errorThreshold: errorThreshold,
		errorCount:     0,
		openExpiresAt:  time.Time{},
	}
}

func (b *CircuitBreaker) Use(callback func() error) error {
	b.mu.Lock()
	if b.isOpen {
		if b.openExpiresAt.After(time.Now()) {
			b.mu.Unlock()
			return errors.New("breaker open")
		}
		b.isOpen = false
	}
	b.mu.Unlock()

	err := callback()
	if err != nil {
		b.mu.Lock()
		defer b.mu.Unlock()

		b.errorCount++
		if b.errorCount >= b.errorThreshold {
			b.isOpen = true
			b.errorCount = 0
			b.openExpiresAt = time.Now().Add(b.openTime)
			return errors.New("breaker open")
		}
    } else {
        b.errorCount = 0
    }

	return nil
}
This is a very basic circuit breaker. Before you email me, yes, there are a few bugs in the edge cases, specifically regarding Go routine coordination. Let’s first focus on the design.
While the above technically satisfies the requirements of the request, it’s cumbersome for developers to use. Compared to the alternatives that we haven’t spent any time thinking about, this is invasive. Not only is it difficult for us to test our own library as it relies on time.Now(), but it’s difficult for developers using our library to test as well. We also hide all errors received by the Circuit Breaker with a “breaker open” message.
Consider also how would a callow to moderately-experienced developer use this method? I would expect that many developers would simply take this code and use it in every method in the SDK that needed a circuit breaker by wrapping their code in Use. This clutters their code and makes it impossible to test.
Can this fate be avoided? I mean, the answer is obviously yes. Other implementations for Circuit Breakers exist. But, let’s start by designing one.
Attempt #2: Let’s design it first
Let’s start over. Instead of diving into the code, let’s put on our product owner hats and put ourselves in our customer’s shoes.
Start with the README
This seems counter-intuitive, but stay with me here. Instead of writing code, write docs. This serves three purposes.
First, it forces you to think about how others will use your code. Second, docs are faster to write than compile-ready code. Third, it forces you to actually write a README, which you should be doing anyway.
By writing docs first, you’ll start by defining the contract or interface your code will have with the developer. As this is much harder to change in the future, it lays a solid foundation for your code and helps it be more adapted to the current problem space as well as future problems.
But what makes a good README?
What’s in the README?
I have an overview of what a good README looks like. Take a quick read and come back. If you have anything you’d like to add to that document, please send over pull requests, I’ll gladly add in any additions that are helpful.
In the 3rd section, the example, we describe how a developer or user would interact with this application. You’d be surprised how many README’s skip this section to their detriment. Let’s start with our end-users:
The Customer
I want customers, non-developers, to be able to use my service with as little interruption as possible. Circuit Breakers could lower our availability if we are recovering from an outage. We need to know that the breaker is causing prolonged interruption. We should provide a way to know if a breaker is open so that we can correlate it with lower availability.
That’s but one example of a user-story from our customers. It’s good to think through the user scenarios, however, for the purposes of the rest of this guide I’d like to focus more on the developer’s story.
The Developer (or future-you)
Let’s pretend to be our user. Really get into their heads. We are developers too, after all. Where’s the best place to insert ourselves? What problem is the developer trying to solve with your circuit breaker?
For greenfield features in GoLang programs, I like to start at the top-level: main. In Java, this is your static class’s Main method. The entry point of the application. This removes as many assumptions and dependencies about the system as possible.
If you’re writing a feature for an existing product, instead start with the context of where this new library will be inserted. If your user is writing an SDK, meet them there instead. The idea is to start as shallow in the call stack as reasonably possible. While it’s possible that you’ll need to insert your code into a leaf function within a library already 12 levels deep into the application, try to consider if you can move it to a more shallow depth.
But what of our example? Let’s assume there’s an API endpoint that goes down and needs time to recover. This API endpoint is fronted by a client SDK. In this case, we’ll make a circuit breaker and inject it into the SDK, rather than requiring the SDK to create one for itself. This allows the SDK to remain de-coupled from the circuit-breaking internals. Additionally, the breaker package can also follow the Single Responsibility Principle.
How do we apply these to IDD?
IDD Fundamentals
By Interface-Driven Development, I don’t literally mean GoLang or Java interface types. You can describe it as a contract, but it’s more than that. It includes not only what your users can do or see when they use the product, but also what they aren’t shown and cannot do.
What variables do you expose? Which classes can they extend? Which functions do you make public? What objects do you return to help them avoid using your library or package incorrectly? Do developers need to look at your documentation to use the library correctly? How can you minimize this?
Most developers these days are using IDE’s with integrated code completion. This should be a first-class citizen and supported by whatever you build. Can you write code such that auto-complete offers only the relevant choices? Oh, and make sure your documentation fills in any details a developer might need to know.

Embrace Interface-Driven Development by starting all libraries by writing code you know or think your customers will have when they use your classes, structs, or methods. Inject yourself there and attempt to minimize the pain on your customers.
When building your interface, what can you cut from the clutter? How can you reduce cognitive load? By focusing on their needs and experiences, it is my hope that we can also improve the quality of the code.
IDD Circuit Breaker Pseudocode
With context and location of our example settled, what does this look like from a user’s perspective? What problems would they be solving with your library? How will they interact with it? Let’s start by writing our README’s example pseudocode. I don’t expect this code to compile. It does not need to be valid GoLang. Just get a feel for it.
package widget

import (
	"context"
	"net/http"
	"time"
)

type SDK struct {
	circuitBreaker *twoStateCircuit.Breaker
	url string
	httpClient http.Client
}

func New() *SDK {
	return &SDK{
		circuitBreaker: twoStateCircuit.New(twoStateCircuit.Opts{
			FailureThreshold: 5,
			OpenDuration: 30 * time.Second,
        }),
    }
}

func (s *SDK) MakeThing(ctx context.Context, thing string) (id uint, err error) {
	req, _ := http.NewRequestWithContext(ctx, http.MethodPost, s.url + "/things", nil)
	s.circuitBreaker.Use(func()error{
		resp, err := s.httpClient.Do(req)
		if err != nil {
			// tell the circuit breaker of the error
			return err
		}
		// do stuff with resp...
		_ = resp
		return nil
	})
	return
}
This is likely the context in which a developer would use our library. It’s not perfect. But it’s a good starting point. What are some problems with this design?
- Each SDK method will require alteration. That adds developer burden. This is the exact problem we had in our head-first approach, but remember, we haven’t written any code, yet.
- The Use function’s callback prevents using
returnto exit the caller’s method. This makes adding functionality or fixes to the SDK more error-prone. - We still need a good way to know if the circuit breaker tripped so that we can log the event.
- The logging is outside the breaker. As other threads can use this breaker, it’s possible for more than 1 caller to log that the breaker tripped. But we want the breaker to send this just once. This also adds code duplication, as each use requires the logging code.
- How do we ignore errors that shouldn’t trigger breaking the circuit? If we get a 400 Bad Request response, should that count? Probably not, right? What about a 429? Or a 500? (answers: no, yes, and yes)
- It’s still hard to test
- Developers can’t customize how the breaker counts errors before tripping. How long are failures within the FailureThreshold valid? How does this value reset over time? We don’t want 5 errors with days between them to trip the breaker. There needs to be some time decay.
What others can you spot?
A second pass
Let’s try this again while addressing the problems we shook out of the first pass. What if we could remove the circuit breaker altogether from our SDK’s calls and just define it once somewhere? Is this possible? How could we do this?
What if we moved the breaker into the http.Client? Instead of injecting our code into each of the SDK’s calls, we create a http.Client that also uses the breaker before actually making HTTP requests.
package main

import (
	"bytes"
	"encoding/json"
	"github.com/wojnosystems/go-circuit-breaker/circuitHTTP"
	"github.com/wojnosystems/go-circuit-breaker/twoStateCircuit"
	"github.com/wojnosystems/go-rate-limit/rateLimit"
	"io/ioutil"
	"net/http"
	"time"
)

func main() {
	breaker := twoStateCircuit.New(twoStateCircuit.OptsWithTokenBucketTripDecider(
		// Create a two-state breaker that will stay in the open state for 30 seconds
		twoStateCircuit.Opts{
			OpenDuration: 30 * time.Second,
		},
		// This breaker will use a token bucket to track error rates. When exceeded, the breaker will trip
		rateLimit.TokenBucketOpts{
			// We only allow up to 2 errors per second
			Capacity:             2,
			TokensAddedPerSecond: 2,
			// Prime the breaker with 2 errors allowed at start, you could set this to 0 and force the breaker
			// to "charge" before use
			InitialTokens: 2,
		},
	))
	s := &SDK{
		baseUrl: "https://example.com/api",
		// Install the breaker we created above into the http client. Any failing requests will interact with the breaker
		httpClient: circuitHTTP.New(breaker, http.DefaultClient),
	}
	_, _ = s.MakeThing("1")
	_, _ = s.MakeThing("2")
	_, _ = s.MakeThing("3")
	_, _ = s.MakeThing("4")
}

type SDK struct {
	httpClient *circuitHTTP.Client
	baseUrl    string
}

type Thing struct {
	Id   uint64 `json:"id"`
	Name string `json:"name"`
}

func (s *SDK) MakeThing(name string) (thingId uint64, err error) {
	t := Thing{
		Name: name,
	}
	serializedThing, err := json.Marshal(t)
	if err != nil {
		return
	}
	resp, err := s.httpClient.Post(s.baseUrl+"/thing", "application/json", bytes.NewBuffer(serializedThing))
	if err != nil {
		return
	}
	defer func() {
		_ = resp.Body.Close()
	}()
	body, err := ioutil.ReadAll(resp.Body)
	if err != nil {
		return
	}
	err = json.Unmarshal(body, &t)
	if err != nil {
		return
	}
	thingId = t.Id
	return
}
What did we do here? We moved the Circuit Breaker code down a level, into the http.Client. By replacing the Client with a struct that wraps the original http.Client interface, we can effectively inject the breaker into every call without bothering the developer to change all of their methods.
Because we can now pass in and replace the breaker logic, we can also provide a suitable site to add in mocks for system failures more easily.
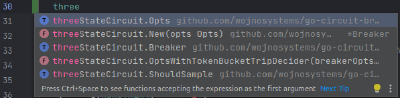
Also, take a look at the package naming convention. I’m explicitly calling it: twoStateCircuit so that the components developers create are “Breaker"s and naming specific breaker types similarly to twoStateCircuit or, eventually threeStateCircuit for our Closed+Open+Half-Open breakers we’ll be using in the future.
This design also provides a package called circuitHTTP that is not only an example of how to wrap breakers for other protocols, like ProtoBuf, but also cleanly separates out the provided breakers from the lower-level implementations. This method allows the original http.Client to still be configured with cookies and other settings as well.
I’ve also empowered the developer to use any error rate limiter they desire by allowing them to provide a method to control when the breaker trips. This originally lead to a very clunky and cumbersome initialization structure. It required the developer to configure the method themselves. I introduced the twoStateCircuit.OptsWithTokenBucketTripDecider function to configure this for them without preventing them from customizing it for any other purpose they may have.
De-clutter. Make complicated, but common approaches easier by providing helpers.
Where’s the code?
Notice that we didn’t actually write the breaker, yet. This is Interface-Driven Development. Pretend that we’ve already written the breaker. This allows us to experiment with what our fictional package would look like before we write the code. I’ll cover a few more interface changes, and provide the implementation.
What’s next?
At this point, you can start development. If you’re a fan of Test-Driven Development, now’s the time to write your tests. This should be a bit easier, as you have a template for what your interfaces should look like thanks to IDD. If you’re not a fan of TDD, please consider it. You can now write your interfaces and backing implementations as well.
Here’s an implementation of the Circuit Breaker above that I came up with following Interface-Driven Development. It changed quite a bit from the head-first development. It’s more robust, easier to test, has more features, and actually works.
Additionally, I ended up breaking this library up into a generic and token-bucket rate limiter, and a way to mock the current time in GoLang. Each of which utilized Interface-Driven Development. As a matter of fact, the decision to break these up into separate packages was due, in part, to trying to hide the details of these components from the Circuit Breaker’s auto-complete.
I didn’t want to clutter my developer’s IDE with things unrelated to the circuit breaker. When populating fields that interact with rate limiting, the IDE can auto-complete the appropriate library and methods that match the desired signatures.
Don’t forget, interface-driven design is part of the SDLC flow. Revise the design while you develop as you discover language limitations or other unworkable first designs. Over time, you’ll learn what you can and cannot do as well as what you should and should not do when creating packages for your happy developers.
Here’s what the Interface-Driven Development designed two-state breaker looks like:
package twoStateCircuit

import (
	"github.com/wojnosystems/go-circuit-breaker/tripping"
	"github.com/wojnosystems/go-circuit-breaker/twoStateCircuit/state"
	"github.com/wojnosystems/go-time-factory/timeFactory"
	"sync"
	"time"
)

type Opts struct {
	// TripDecider is consulted each time a tripping error occurs.
	TripDecider tripping.Decider

	// OpenDuration is how long to stay in the OpenState before closing again
	OpenDuration time.Duration

	// OnStateChange if set, will emit the state the breaker is transitioning into
	// leaving as nil to avoid listening to state changes
	// Do NOT close this channel or a panic will occur
	OnStateChange chan<- state.State

	// nowFactory allows the current time to be simulated
	nowFactory timeFactory.Now
}

type mutableState struct {
	state         state.State
	lastError     error
	openExpiresAt time.Time
}

// Breaker is a live circuit breaker that only has 2 states: closed and open.
// Use New to create a new Breaker, populated with options.
type Breaker struct {
	opts Opts
	mu   sync.RWMutex
	mutableState
}

func New(opts Opts) *Breaker {
	return &Breaker{
		opts: opts,
		mutableState: mutableState{
			state: state.Closed,
		},
	}
}

// Use the breaker, if closed, attempt the callback, if open, return the last error
// automatically transitions state if necessary
// callbacks can be called concurrently. Use will not block while the callback is being executed.
// This does mean that sometimes, callbacks will be called while the breaker has already tripped.
func (b *Breaker) Use(callback func() error) error {
	{
		stateCopy, now := b.copyCurrentState()
		if stateCopy.state == state.Open {
			if stateCopy.openExpiresAt.After(now) {
				// still in the open state, not expired
				return stateCopy.lastError
			}

			b.transitionToClosedIfShould()
		}
	}

	// at this point, we have either returned or we're in the closed state
	err := callback()
	if !tripping.IsTripping(err) {
		// error was nil or not tripping, just return
		return err
	}

	trippingError := err.(*tripping.Error)
	unwrappedError := err.(*tripping.Error).Err

	// we encountered an error, we need to count this against our error threshold and transition if need be
	b.recordErrorAndTransitionToOpenIfShould(trippingError)
	return unwrappedError
}

func (b *Breaker) copyCurrentState() (currentState mutableState, now time.Time) {
	b.mu.RLock()
	defer b.mu.RUnlock()
	currentState.state = b.state
	currentState.openExpiresAt = b.openExpiresAt
	currentState.lastError = b.lastError
	now = b.opts.nowFactory.Get()
	return
}

func doNothing() {}

func (b *Breaker) transitionToClosedIfShould() {
	afterUnlock := doNothing
	b.mu.Lock()
	defer func() {
		b.mu.Unlock()
		afterUnlock()
	}()
	// are we still recorded as being in the open state?
	if b.state == state.Open && b.opts.nowFactory.Get().After(b.openExpiresAt) {
		// perform the transition exactly once for this round
		b.state = state.Closed
		afterUnlock = func() {
			b.notifyStateChanged(state.Closed)
		}
	}
}

func (b *Breaker) recordErrorAndTransitionToOpenIfShould(trippingError *tripping.Error) {
	b.mu.Lock()
	afterUnlock := doNothing
	defer func() {
		b.mu.Unlock()
		afterUnlock()
	}()

	// record the error
	errorRateWithinLimits := !b.opts.TripDecider.ShouldTrip(trippingError)

	if b.state != state.Closed || errorRateWithinLimits {
		// already transitioned state to open OR
		// error rate not yet exceeded, no need to transition
		return
	}

	// transition to the Open State
	b.lastError = trippingError.Err
	b.state = state.Open
	b.openExpiresAt = b.opts.nowFactory.Get().Add(b.opts.OpenDuration)
	afterUnlock = func() {
		b.notifyStateChanged(state.Open)
	}
}

func (b *Breaker) notifyStateChanged(newState state.State) {
	if b.opts.OnStateChange != nil {
		b.opts.OnStateChange <- newState
	}
}
Recap
It’s tempting to use depth-first development, but what problems can this cause?
- Losing sight of the bigger goal. I get so focused on connecting them back together again.
- Programming-first approaches are usually easier for you, but harder for the programmer who will use your code later.
- Doesn’t force you to think of dependencies up-front, so you’ll be bolting things on in the future as things inevitably get more complex
Put yourself in the shoes of your users: both developers and non-developers. They’ll thank you, and you will thank you in the future.
- Write pseudo code in a README
- Pretend to be your user
- Simplify simplify simplify the interface. Limit what they can see and interact with to just what is necessary for your code in your package to work
Good luck! Happy coding!
If you liked this content and want to encourage me to write more, please leave a comment and share with your friends or various aggregation websites.
Citations
- 20 Things I’ve Learned in my 20 Years as a Software Engineer Justin Etheredge. item 3
- Code quality: a concern for businesses, bottom lines, and empathetic programmers Isaac Lyman
- Circuit Breaker pattern - Cloud Design Patterns. Microsoft
- CircuitBreaker Martin Fowler
